Robot Dog Assembly
Build the Robot Dog in a step-by-step fashion by following the instructions below. Before starting the assembly, identify all the parts included in the kit.
Parts Included in the Kit
The image below shows all the parts required to build the DIY Robot Dog.
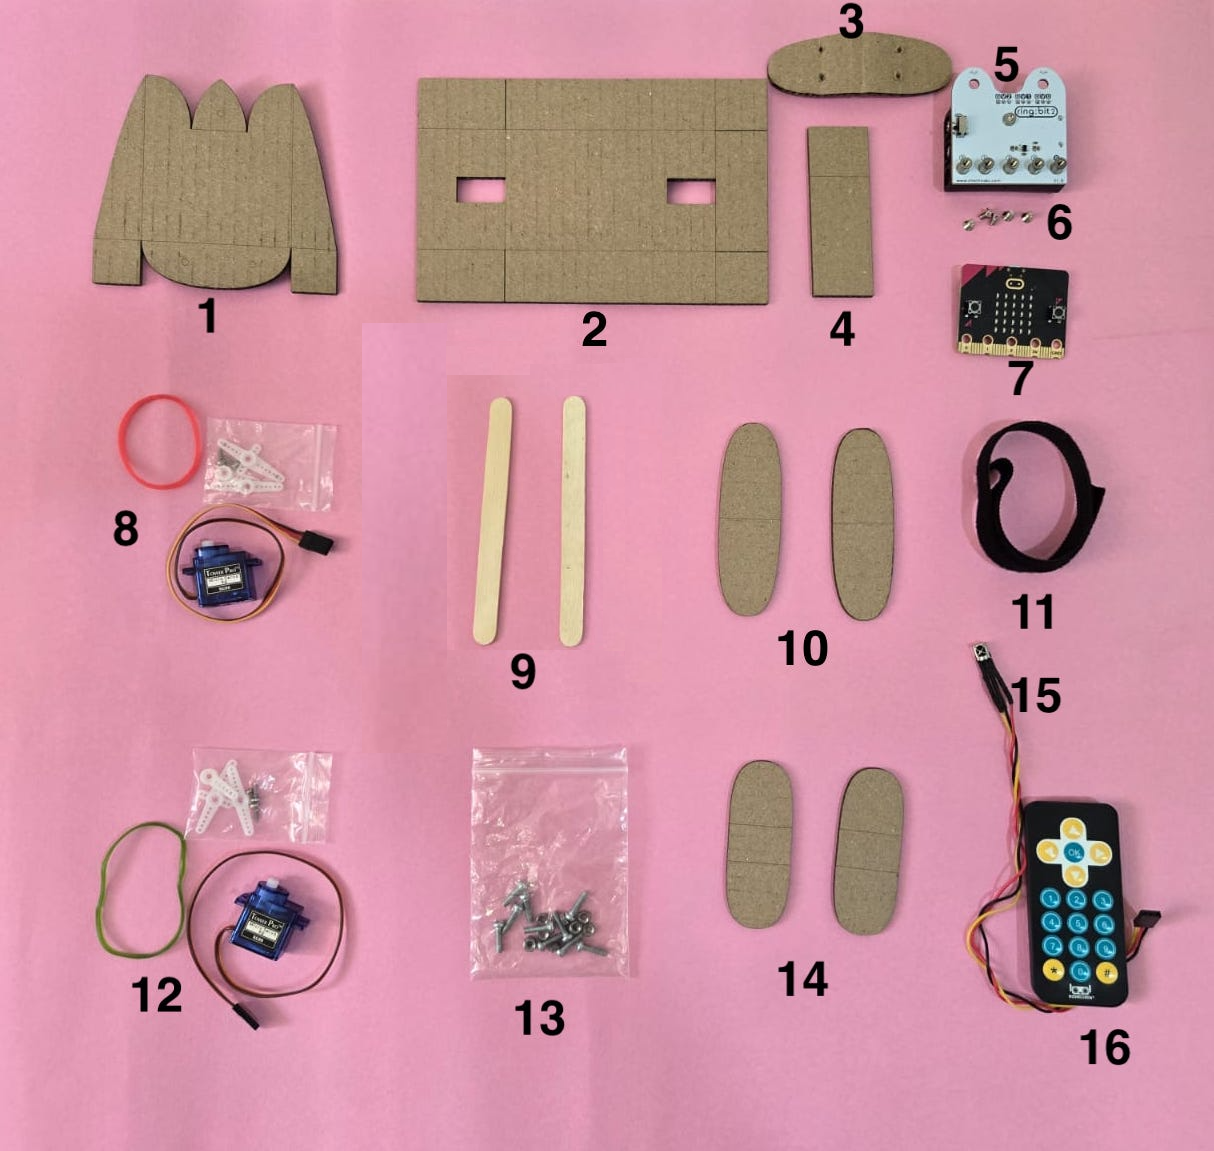
Parts Identification
| No. | Part Name | Description / Use |
|---|---|---|
| 1 | Head | Cardboard head part used as the front face of the Robot Dog. |
| 2 | Body | Main cardboard body frame used to hold the legs, servos, board, and electronics. |
| 3 | Tail | Cardboard tail part attached to the rear side of the Robot Dog. |
| 4 | Neck | Cardboard neck support used to connect the head to the body. |
| 5 | Expansion Board | Micro:bit expansion board used to connect servo motors, IR sensor, and power. |
| 6 | Screws for Expansion Board | Small screws used to mount microbit on the expansion board. |
| 7 | Micro:bit | BBC micro:bit controller used as the brain of the Robot Dog. |
| 8 | Servo Motor with Screws and Rubber Band | Servo motor set used for front leg of the robot dog. |
| 9 | Ice Cream Sticks | Wooden sticks used as support links for the leg movement mechanism. |
| 10 | Front Legs | Cardboard front legs used for the walking motion. |
| 11 | Band for Holding Micro:bit and Expansion Board | Band used to secure the micro:bit and expansion board together on the robot dog body. |
| 12 | Servo Motor with Screws and Rubber Band | Servo motor set used for the back legs of the robot dog. |
| 13 | Screws and Nuts | Screws and nuts used to join cardboard parts and mechanical links. |
| 14 | Back Legs | Cardboard back legs used for the walking motion. |
| 15 | IR Sensor | Infrared receiver sensor used to receive commands from the IR remote. |
| 16 | IR Remote Control | Remote control used to send movement commands to the Robot Dog. |
Before You Start
Make sure all parts are available before beginning the assembly.
You will need:
- Micro:bit
- Expansion board
- Two servo motors
- Front and back leg parts
- Head, neck, body, and tail parts
- Screws and nuts
- IR sensor
- IR remote control
- Rubber bands
- Ice cream sticks
Assembly Overview
The Robot Dog is built in the following stages:
- Set the servo motor horns.
- Assemble the front leg mechanism.
- Assemble the back leg mechanism.
- Attach both front and back legs.
- Fix the legs to the body.
- Attach the head and neck.
- Mount the micro:bit and expansion board.
- Connect the IR sensor and servo motors.
- Upload the program and test the Robot Dog.