Head and Neck
6. Assemble Head and Neck
In this step, we will fix the head and neck parts of the Robot Dog. The head gives the Robot Dog its final shape, and the neck connects the head firmly to the body.
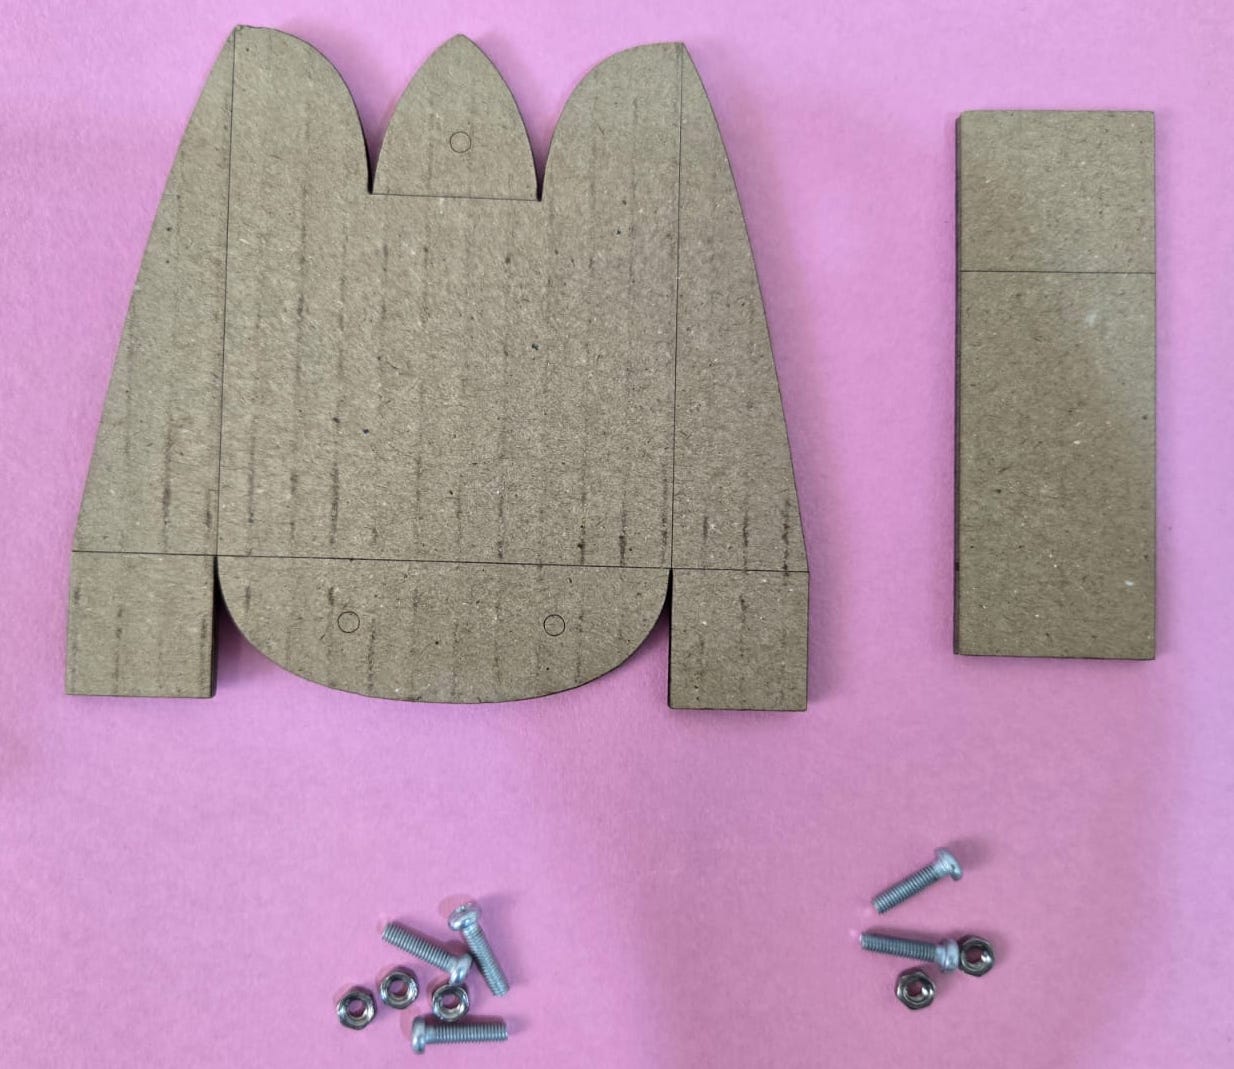
Parts Required
| Part | Quantity | Description |
|---|---|---|
| Head cardboard part | 1 | Front head section of the Robot Dog |
| Neck cardboard part | 1 | Rectangular cardboard piece used to connect the head to the body |
| Screws for head | 3 | Used to fix the head part securely |
| Nuts for head | 3 | Used with the head screws |
| Screws for neck | 2 | Used to fix the neck to the body |
| Nuts for neck | 2 | Used with the neck screws |
1. Identify the Head Part
Take the large cardboard head part.
The head part has two side flaps and a center face section. It also has marked fold lines and screw holes.
Keep the head part flat on the table and identify the fold lines before fixing it.
2. Fold the Head Shape
Fold the head gently along the marked fold lines.
Make sure:
- The side flaps bend evenly.
- The center face section remains in front.
- The screw holes are aligned.
- The folded shape looks balanced from both sides.
Do not force the cardboard while folding. Fold slowly along the marked lines to avoid damage.
3. Fix the Head Using 3 Screws and Nuts
Use 2 screws and 2 nuts to secure the bottom part of head shape.
Insert the screws through the matching holes in the head part and tighten them using nuts.
Use 1 screw for the top/center fixing point
Tighten the screw gently. The head should be firm, but the cardboard should not get crushed. Nut we will fix it after inserting this into the neck.
4. Identify the Neck Part
Take the rectangular cardboard neck piece.
The neck part is used to connect the head to the body. It should be folded along the marked line if required.
Make sure the neck piece is straight and the holes are aligned with the body.
5. Attach the Neck to the Body
Place the neck part on the front side of the Robot Dog body.
Align the holes on the neck with the holes on the body.
Use 2 screws and 2 nuts to fix the neck to the body at the bottom part of the neck
Tighten both screws gently so that the neck is firmly attached to the body.
6. Attach the Head to the Neck
Press the head the 1 screw centre point onto the neck support.
Align the head properly so that it faces forward.
Check that the head is centered and not tilted to the left or right.
If the head is fixed into the neck press gently until it fits properly. Fit the nut and tighten carefully.
7. Final Alignment Check
After fixing the head and neck, check the following:
- The head is facing forward.
- The neck is fixed firmly to the body.
- The head is not loose.
- The screws and nuts are tightened properly.
- The head does not touch the moving legs.
- The servo wires are not trapped under the head or neck.
Head and Neck Assembly Video
Important Notes
- Use exactly 3 screws and nuts for fixing the head.
- Use exactly 2 screws and nuts for fixing the neck to the body.
- Do not overtighten the screws, as cardboard can get damaged.
- Make sure the neck is fixed straight before attaching the head.
- The head should not block the movement of the legs or servo wires.
Troubleshooting
| Issue | Possible Reason | Solution |
|---|---|---|
| Head is loose | Screws are not tightened properly | Tighten the middle head screw gently |
| Neck moves after fixing | Neck screws are loose | Tighten the 2 neck screws and nuts |
| Head is tilted | Head was not aligned before tightening | Loosen, realign, and tighten again |
| Cardboard bends or crushes | Screws are overtightened | Loosen slightly and adjust |
| Head touches the legs | Head or neck is mounted too low or tilted | Reposition the neck and head |
Completed Step
The head and neck are now fixed to the Robot Dog body.
In the next step, mount the micro:bit expansion board, connect the servo motors, and prepare the Robot Dog for programming and testing.